Tough Knots for Big Fish
with
D.C. Reid
illustrations by Barb Krimmer
Surprisingly, the weakest link in the fishing tackle between the reel in your hand and the lure in the salmon's mouth is the knot. This may seem unlikely, because a knot is larger than the line from which it is made; however, the sudden pressure of slack line popping taut or unrelenting pressure of fish, gear and current often lead to breaks, 75% of which occur at knots. The more knots in the line, the more spots where line can break or unravel. The secret to preventing the unpleasant outcome of lost fish and tackle is employing the proper knot and tying it correctly.
While there are more knots in the fishing world than you can shake a hootchie at, over the decades, three have become standards: the palomar; the clinch knot; and, the sliding knot.
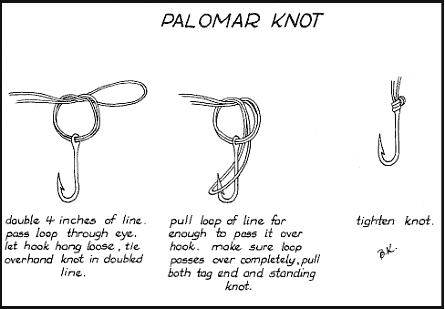
The palomar is a general purpose knot. The simplest of the three to tie it is also the strongest. It can be used to join a variety of line types to tackle - monofilament, braided and dacron.
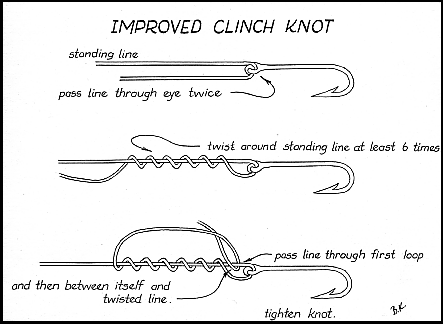
The clinch knot, or the improved version shown below, finds its best use where the length of line must be exact. The obvious example is in leaders, ie., the line between lure and ball-bearing swivel, most commonly the knot to the swivel. If you require a leader of 24 inches, for example, you can, with practice, learn to make a clinch knot that gives exactly 24 inches leader when tightened. Bulkier than the palomar, the clinch knot is most easily tightened on monofilament line. Braided line often proves too slippery for security; dacron has too much bulk to tighten-down onto itself.
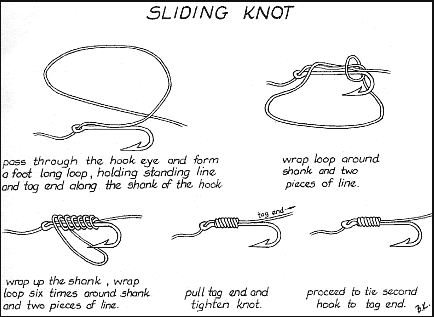
The sliding knot is used to tie a knot on the shaft of a hook, usually two singles in tandem or a trailing single with a leading treble. Sliding knots allow for movement of hook along the line and changing the plane of the hook, hence the name. This can be vital to producing that fish- tantalizing wounded-spiral action so desired in bait setups. When tying singles, make sure that the barb of each hook points in the same direction or one points down and one up. This leads to a smooth, balanced action in lures and aids presentation of bait.
As would be expected, knots need to be tight. They should be tightened as though you were Arnold Schwarzenegger, or they will unravel. Unfortunately, the friction of securing a knot this well builds up heat. Weakening occurs and thus breaks occur at knots more frequently than anywhere else. Fortunately, friction can be minimized easily. Lubricate the knot with dish soap. Palmolive seems to be the best. Then wash off any extra. The obvious alternative - a little dab of spit - works almost as well, but leaves a taste that fish find more offensive than soap. I have to admit that as a fisher of almost 40 years experience, I find the use of soap counterintuitive. Since the point of fishing is to catch fish, however, I will do anything to improve my chances, no matter how small a contribution it makes to the outcome.
Although fly fishers commonly attach leader, flyline and backing line with knots, conventional salmon fishing is a brute force sport and much harder on line, particularly at knots. The sea, shark skin, reefs, fishing vicissitudes and boat abrasions all lead to weakened line. Never try to save money by connecting two pieces of mainline with a knot; it will break. Throw out old, nicked, weakened line and treat yourself to a new spool. You will be rewarded with more fish in the boat. Also, get in the habit of stripping off 6 to 10 feet of line and retying the ball bearing endchanger on your mainline. If you use slip weights, retie the endchanger each day out.
Wireline - for downriggers and planers - requires other techniques. Use line crimpers and pliers to form loops around clips or swivels. Connect fishing line to endchangers or directly to wire line with improved clinch knots.
Palomar Knot
-
Form a loop in the line and push it through the eye of a hook (swivel, endchanger, etc.).
-
Tie an overhand knot with the loop, allowing the hook to hang free.
-
Pass the loop over the hook and tighten the knot.

Improved Clinch Knot
-
Pass the line through the eye of a hook.
-
Circle around and pass the line through the eye a second time.
-
Twist the free end around the standing line a minimum of 6 times.
-
Pass the free line through the loop formed at the first twist.
-
Pass the free line back between itself and the twisted line.
-
Carefully tighten the knot.

Sliding Knot
-
Pass at least a foot of line through the eye of a hook.
-
Form a loop and hold the free end as well as the standing line against the shank of the hook.
-
Wrap loop around shank 6 or 7 times. Each successive wrap must climb the shank toward the eye of the hook.
-
Pull the free end and tighten the knot.
-
Pass the free end through the eye of the second hook and repeat steps 2, 3 and 4. Prior to final tightening, the knot can be slid up or down the shank of the second hook and rotated to make hooks lie in the same plane.

|


